https://github.com/wooridle/DeepRL_tutorial/blob/master/install_guide_window.md   

Posted by 꿈을펼쳐라
,

Lec 12  Recurrent Neural Network


1. Concept of RNN

   1) Basic Concept


        - 현재의 상태값을 계산하는데, 이전의 상태값이 사용됨           

        - 단, 모든 타입 스텝에 대해ㅏ여 동일 함수, 동일 파라미터가 적용됨 

   2) Vanilla RNN 


   3) Character-level Language Model 

      - output layer값으로 solftMax를 구하여 정확도를 구하고, 정확도의 평균을 

        Cost 함수로 하여 최소화하는 학습을 진행할 수 있음 


 2. RNN applications

  1) application field  

      • Language Modeling 
      • Speech Recognition
      • Machine Translation
      • Conversation Modeling / Question Answering (Chat Bot) 
      • Image / Video Captioning 
      • Image / Music / Dance Generation

        참고 : https://github.com/TensorFlowKR/awesome_tensorflow_implementations


  2) application type 

    - one to one : Vanilla Neural Networks

    - one to many : Image Captioning  

    - many to one : Sentiment Classification 

    - many to many : Machine Translation 

    - many to many : Video Classification on frame level


  3) multi-Layer RNN


  4) RNN Training Model 

     - Long Short Term Memory (LSTM) 

     - GRU by Cho. et al. 2014


Lab 12  RNN in TF

1. Concept of RNN in TF 

   1) Cell : 상황에 따라서 결정 (hiden_size는 자유롭게 설정 가능)

   2) 결과 : outputs과, states 두 개가 나오지만, states는 거의 사용하지 않음


2. Input / Output RNN in TF  

   1) One Node: 4 input in 2 hidden_size 

  2) Unfolding to n sequence


  3) Batching Input / Output


3. ....


Posted by 꿈을펼쳐라
,

Lec 11  ConvNet의 Conv 레이어 만들기

1.  Concept of Convolution


 고양이 뇌 실험을 통해 스크린의 변화를 인지하는 데 사용하는 뇌의 기능은 뇌 전체가 아닌 일부 뇌만을 사용함.

 신경망을 사용할때 전체를 다 파악하는 것이 아닌 부분을 판단하는 방식을 적요하는 방법 


2.  Size of filter


3.  Convolution Layers

4. Pooling Layer


convolution Layer와 Pooling Layer와의 차이는 Convolution Layer의 weight는 학습을 통해서 결정되지만 Pooling Layer는 정해진 방식에 따라 적용됨.  ( 학습하는 것이 아닌, 대표값 정하는 방식으로)


5. Case Study


LeCun et. al

2012년 ImageNet 경진 대회 우승   

현재는 Normalization Layer는 사용하지 않음


2014년 ImageNet 경진 대회 우승


2015년 다수의 경진 대회 우승


Revolution of Depth

  - fast forward 기법 적용 :  계산값을 2-3 단계 이후 결과값이 Jump하여 적용 


2016, 2017  이미지넷 우승은?


2016

2.99%의 Trimps-Soushen 팀. (The Third Research Institute of the Ministry of Public Security, 중국 공안부 산하 연구팀). ResNet, Inception, Inception-Resnet를 혼합하여 적용 


2017

사물 종류별 검출 성능 :  남경정보과학기술대(NUIST, 중국 ) 

평균 검출 정확도 : 남경정보과학기술대(NUIST, 중국) , 0.61  


2017년 경진대회를 끝으로 이미지넷 경진 대회는 더 진행하지 않는다고 함.


Lab 11  CNN 

1. CNN Process ( 3 step)


2. CNN with Tensorflow

  1) conv2d 

  2) conv2


  3) MNIST Data Load

  4) apply Conv Layer


  5) apply Max Pooling


이후 MNIST 데이터에 대한 convolution layer 적용은 

https://docs.google.com/presentation/d/1h90rpyWiVlwkuCtMgTLfAVKIiqJrFunnKR7dqPNtI6I/edit#slide=id.g1dc2d142ea_0_399 

에서 확인


Posted by 꿈을펼쳐라
,

Lab 10  NN, ReLu, Xavier, Dropout, and Adam

1.  softmax for MNIST

# define cost/loss & optimizer
cost = tf.reduce_mean(tf.nn.softmax_cross_entropy_with_logits(
    logits=hypothesis, labels=Y))
optimizer = tf.train.AdamOptimizer(learning_rate=learning_rate).minimize(cost)

# initialize
sess = tf.Session()
sess.run(tf.global_variables_initializer())


Epoch: 0014 cost = 0.419000337

Epoch: 0015 cost = 0.406490815

Learning Finished!

Accuracy: 0.9035


2.  NN for MNIST with ReLU


여러개의 계산 단계를 거침


# input place holders

X = tf.placeholder(tf.float32, [None, 784])

Y = tf.placeholder(tf.float32, [None, 10])


# weights & bias for nn layers

W1 = tf.Variable(tf.random_normal([784, 256]))

b1 = tf.Variable(tf.random_normal([256]))

L1 = tf.nn.relu(tf.matmul(X, W1) + b1)


W2 = tf.Variable(tf.random_normal([256, 256]))

b2 = tf.Variable(tf.random_normal([256]))

L2 = tf.nn.relu(tf.matmul(L1, W2) + b2)


W3 = tf.Variable(tf.random_normal([256, 10]))

b3 = tf.Variable(tf.random_normal([10]))

hypothesis = tf.matmul(L2, W3) + b3


# define cost/loss & optimizer

cost = tf.reduce_mean(tf.nn.softmax_cross_entropy_with_logits(

  logits=hypothesis, labels=Y))

optimizer = tf.train.AdamOptimizer(learning_rate=learning_rate).minimize(cost)


Epoch: 0014 cost = 0.624131458

Epoch: 0015 cost = 0.454633765

Learning Finished!

Accuracy: 0.9455


3.  Xavier, Adam for MNIST


초기값이 초기부터 낮음 


# input place holders

X = tf.placeholder(tf.float32, [None, 784])

Y = tf.placeholder(tf.float32, [None, 10])


# weights & bias for nn layers

# http://stackoverflow.com/questions/33640581

W1 = tf.get_variable("W1", shape=[784, 256],

                   initializer=tf.contrib.layers.xavier_initializer())

b1 = tf.Variable(tf.random_normal([256]))

L1 = tf.nn.relu(tf.matmul(X, W1) + b1)


W2 = tf.get_variable("W2", shape=[256, 256],

                   initializer=tf.contrib.layers.xavier_initializer())

b2 = tf.Variable(tf.random_normal([256]))

L2 = tf.nn.relu(tf.matmul(L1, W2) + b2)


W3 = tf.get_variable("W3", shape=[256, 10],

                   initializer=tf.contrib.layers.xavier_initializer())

b3 = tf.Variable(tf.random_normal([10]))

hypothesis = tf.matmul(L2, W3) + b3


# define cost/loss & optimizer

cost = tf.reduce_mean(tf.nn.softmax_cross_entropy_with_logits(

  logits=hypothesis, labels=Y))

optimizer = tf.train.AdamOptimizer(learning_rate=learning_rate).minimize(cost)


Epoch: 0001 cost = 0.301498963

Epoch: 0002 cost = 0.107252513

Epoch: 0003 cost = 0.064888892

....

Epoch: 0014 cost = 0.002714260

Epoch: 0015 cost = 0.004707661

Learning Finished!

Accuracy: 0.9783

Epoch: 0001 cost = 141.207671860

Epoch: 0002 cost = 38.788445864

Epoch: 0003 cost = 23.977515479


4.  Deep NN for MNIST

단순한 Deep 만으로는 효과가 나지 않고 Dropout 적용를 통해서 효과 확인

# dropout (keep_prob) rate  0.7 on training, but should be 1 for testing

keep_prob = tf.placeholder(tf.float32)


W1 = tf.get_variable("W1", shape=[784, 512])

b1 = tf.Variable(tf.random_normal([512]))

L1 = tf.nn.relu(tf.matmul(X, W1) + b1)

L1 = tf.nn.dropout(L1, keep_prob=keep_prob)


W2 = tf.get_variable("W2", shape=[512, 512])

b2 = tf.Variable(tf.random_normal([512]))

L2 = tf.nn.relu(tf.matmul(L1, W2) + b2)

L2 = tf.nn.dropout(L2, keep_prob=keep_prob)

# train my model

for epoch in range(training_epochs):

   ...

  for i in range(total_batch):

      batch_xs, batch_ys = mnist.train.next_batch(batch_size)

      feed_dict = {X: batch_xs, Y: batch_ys, keep_prob: 0.7}

      c, _ = sess.run([cost, optimizer], feed_dict=feed_dict)

      avg_cost += c / total_batch


# Test model and check accuracy

correct_prediction = tf.equal(tf.argmax(hypothesis, 1), tf.argmax(Y, 1))

accuracy = tf.reduce_mean(tf.cast(correct_prediction, tf.float32))

print('Accuracy:', sess.run(accuracy, feed_dict={

    X: mnist.test.images, Y: mnist.test.labels, keep_prob: 1}))


Epoch: 0014 cost = 0.041290121

Epoch: 0015 cost = 0.043621063

Learning Finished!

Accuracy: 0.9804!!


5.  Optimizer : Adam 추천 


6. Summary

  • Softmax VS Neural Nets for MNIST, 90% and 94.5%

  • Xavier initialization: 97.8%

  • Deep Neural Nets with Dropout: 98%

  • Adam and other optimizers

  • Exercise: Batch Normalization

Posted by 꿈을펼쳐라
,

Lec 10-1  More than Sigmoid : ReLU

1.  Vanish Gradient 


 Depth가 2~3일 경우에는 잘 해결되었던 문제가, Depth 가 깊어질 수록 문제해결이 어려워짐. 


 원인중 하나는 sigmoid함수 적용에 있는데, 아주 크거자 작은 값도 무조건 0~1 사이의 값을 보여지다 보니 그 값의 영향력이 작아지고 이로 인해 정확한 계산이 어려워 진다.


2.  Geoffrey Hinton's Summary  


  • Our labeled datasets were thousands of times too small. 
  • Our computers were millions of times too slow. 
  • We initialized the weights in a stupid way. 
  • We used the wrong type of non-linearity.


3.  ReLU 


  in Tensorflow 


  L1 = tf.sigmoid(tf.matmul(X, W1) + b1) 

  L1 = tf.nn.relu(tf.matmul(X, W1) + b1)


적용 예  

  중간 계산 과정은 모두 ReLU를 사용하고, 마지막에는 Sigmoid를 사용한다.


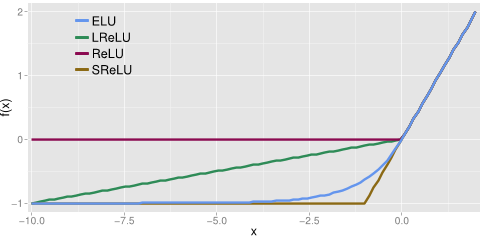
4. Activation Functions 


   1) Sigmoid :  0~1 사이

   2) tanh : -1 ~1 사이

   3) ReLU : -무시, +선형 

   4) Leaky ReLu :-일 경우 0.1 가중치 선형, +경우 1 가중치 선형

   5) max out : 선형변환의 최대값 

   6) ELU : - 구간 지수함수 적용  ( 최대 -1)


eluELU RELU maxout cifar-10에 대한 이미지 검색결과


Lec 10-2  Weigth 초기화 잘해보자

1.  Geoffrey Hinton's Summary  


  • Our labeled datasets were thousands of times too small. 
  • Our computers were millions of times too slow. 
  • We initialized the weights in a stupid way. 
  • We used the wrong type of non-linearity.


2.  RBM 

  1) Restricted Boatman Machine 

  2) Hinton et al. (2006) "A Fast Learning Algorithm for Deep Belief Nets” 

  3) concept : 1 단계별 forward & backward시 값차이가 가장 적게 발생하는 weight 값을 초기값으로 사용

  4) Deep Belief Network 


3.  Xavier/He initialization 

  1) Xavier initialization: 

     X. Glorot and Y. Bengio, “Understanding the difficulty of training deep feedforward neural networks,” in International conference on artificial intelligence and statistics, 2010

  2) He’s initialization: 

    K. He, X. Zhang, S. Ren, and J. Sun, “Delving Deep into Rectifiers: Surpassing Human-Level Performance on ImageNet Classification,” 2015

  3) Makes sure the weights are ‘just right’, not too small, not too big 

  4) Using number of input (fan_in) and output (fan_out)

  5) application


def xavier_init(n_inputs, n_outputs, uniform=True):

  """Set the parameter initialization using the method described.
  This method is designed to keep the scale of the gradients roughly the same
  in all layers.
  Xavier Glorot and Yoshua Bengio (2010):
           Understanding the difficulty of training deep feedforward neural
           networks. International conference on artificial intelligence and
           statistics.
  Args:
    n_inputs: The number of input nodes into each output.
    n_outputs: The number of output nodes for each input.
    uniform: If true use a uniform distribution, otherwise use a normal.
  Returns:
    An initializer.
  """
  if uniform:
    # 6 was used in the paper.
    init_range = math.sqrt(6.0 / (n_inputs + n_outputs))
    return tf.random_uniform_initializer(-init_range, init_range)
  else:
    # 3 gives us approximately the same limits as above since this repicks
    # values greater than 2 standard deviations from the mean.
    stddev = math.sqrt(3.0 / (n_inputs + n_outputs))
    return tf.truncated_normal_initializer(stddev=stddev)


Lec 10-3  Dropout과 앙상블


1.  Solutions for overfitting

  1) More training data

  2) Reduce the number of features 

  3) Regularization


2.  Regularization

  1) Let's not have too big numbers in the weight 


  2) Dropout 

    - A Simple Way to Prevent Neural Networks from Overfitting [Srivastava et al. 2014]


  - randomly set some neurons to zero in the forward pass  


3. Ensenble


Lec 10-4  레고처럼 네트워크 모듈을 마음껏 쌓아 보자


Posted by 꿈을펼쳐라
,

Lec 09-1  Neural Nets(NN) for XOR

1. Forward Propagation 


2. NN for Vector 


K= tf.sigmoid(tf.matmul(X,W1) + b1)

hypothesis = tf.sigmoid(tf.matmul(K,W2) + b2 )


Lec 09-x  미분 정리하기 

1. Basic derivative 


2. Partial derivative : consider other variables as constants


Lec 09-2  딥넷트웍 학습 시키기 (backpropagation)

1. Back propagation 


   1) 1974, 1982 by Paul Werbos, 1986 by Hinton


    https://devblogs.nvidia.com/parallelforall/inference-next-step-gpu-accelerated-deep-learning/


2. Back Propagation (chain rule)

  1) forward (w =-2, x=5, b=3) 

  2) backward : derivative


    3) derivative sigmoid


Lab 09-1 : Neural Net for XOR

1. XOR data set 

x_data = np.array([[0, 0], [0, 1], [1, 0], [1, 1]], dtype=np.float32)

y_data = np.array([[0],    [1],    [1],    [0]], dtype=np.float32)


2. Single Model로는 풀수 없음 


3. Neural Nets for XOR 

W = tf.Variable(tf.random_normal([2, 1]), name='weight')

b = tf.Variable(tf.random_normal([1]), name='bias')


# Hypothesis using sigmoid: tf.div(1., 1. + tf.exp(tf.matmul(X, W)))

hypothesis = tf.sigmoid(tf.matmul(X, W) + b)


W1 = tf.Variable(tf.random_normal([2, 2]), name='weight1')

b1 = tf.Variable(tf.random_normal([2]), name='bias1')

layer1 = tf.sigmoid(tf.matmul(X, W1) + b1)


W2 = tf.Variable(tf.random_normal([2, 1]), name='weight2')

b2 = tf.Variable(tf.random_normal([1]), name='bias2')

hypothesis = tf.sigmoid(tf.matmul(layer1, W2) + b2)


Hypothesis:  [[ 0.01338216]

 [ 0.98166394]

 [ 0.98809403]

 [ 0.01135799]] 

Correct:  [[ 0.]

 [ 1.]

 [ 1.]

 [ 0.]] 

Accuracy:  1.0


4. Wide & Deep 

    1) Wide : 변수의 갯수를 늘리는 것 

    2) Deep : 모델 수를 더 많이 사용하는 것 (


Lab 09-2 : Tensorboard (Neural Net for XOR)

1. 5 steps of using TensorBoard 


1 step : From TF graph, decide which tensors you want to log

w2_hist = tf.summary.histogram("weights2", W2)

cost_summ = tf.summary.scalar("cost", cost)

2 step : Merge all summaries

summary = tf.summary.merge_all()

3 step : Create writer and add graph

# Create summary writer

writer = tf.summary.FileWriter(‘./logs’)

writer.add_graph(sess.graph)

4 step : Run summary merge and add_summary

s, _ = sess.run([summary, optimizer], feed_dict=feed_dict)

writer.add_summary(s, global_step=global_step)

5 step : Launch TensorBoard

tensorboard --logdir=./logs


2. Result of tensorflow


Posted by 꿈을펼쳐라
,

Lec 08-1 딥러닝의 기본 개념: 시작과 XOR 문제

1. Activation Functions


   사람의 신경을 연구하여 유사 구조로 만듦

2. XOR Problem :


   1) 선형적 논리구조로는 풀지 못함. 

   2) Perceptrons (1969 ) by Marvin Minsky, founder of the MIT AI Lab


   3) Backpropagation (1974, 1982 by Paul Werbos,  1986 by Hinton)


3. Convolutional Neural Networks

   1) 고양이 뇌 실험 

    - 뇌가 이미지를 판단할 때 전체를 사용하는 것이 아니라 그림의 형태에 따라 일부의 뉴런만 사용한다. 

    2) 부분만 사용하여 연산한 후 나중에 합치는 방식 : LeCun 


4. Big Problem


  1) Backpropagation just did not work well for normal neural nets with many

  2) Other rising machine learning algorithms: SVM, RandomForest, etc.

  3) 1995 “Comparison of Learning Algorithms For Handwritten Digit Recognition” by LeCun et al. 

     found that this new approach worked better


Lec 08-2 딥러닝의 기본 개념 2: back-propagation 과 2006/2007 '딥'의 출현

1. Breakthrough : in 2006 and 2007 by Hinton and Bengio

  1) Neural networks with many layers really could be trained well,

     if the weights are initialized in a clever way rather than randomly.

  2) Deep machine learning methods are more efficient for difficult problems than shallow methods.

  3) Rebranding to Deep Nets, Deep Learning


2. ImageNet Classification (2012 ) : 26.2% -> 15.3 %  

   1) 2015년 standford 연구생이 코딩으로 개발한 건보다, CNN을 이용해서 개발한 모델이 정확하게 예측함


Lab 08 Tensor Manipulation

1. Array  

  1) Simple Array [1D]

t = np.array([0., 1., 2., 3., 4., 5., 6.])

pp.pprint(t)

print(t.ndim) # rank

print(t.shape) # shape

print(t[0], t[1], t[-1])

print(t[2:5], t[4:-1])

print(t[:2], t[3:])

array([ 0.,  1.,  2.,  3.,  4.,  5.,  6.])

1   -> 김성훈 교수님 예제 잘못되어 있음 

(7,)

0.0 1.0 6.0

[ 2.  3.  4.] [ 4.  5.]

[ 0.  1.] [ 3.  4.  5.  6.]


  2) 2D Array 

t = np.array([[1., 2., 3.], [4., 5., 6.], [7., 8., 9.], [10., 11., 12.]])

pp.pprint(t)

print(t.ndim) # rank

print(t.shape) # shape

array([[  1.,   2.,   3.],

       [  4.,   5.,   6.],

       [  7.,   8.,   9.],

       [ 10.,  11.,  12.]])

2

(4, 3)


  3) Shape, Rank, Axis

Shape : 배열의 크기  - 가장 안쪽에서 뒤에서 부터 표시

Rank : 배열의 차원

Axis : 배열 요소의 순서 ( X :0 , Y : 1, Z : 3) 


  4) MatMul Vs multiply 

matrix1 = tf.constant([[3., 3.]])

matrix2 = tf.constant([[2.],[2.]])


tf.matmul(matrix1, matrix2).eval()

(matrix1*matrix2).eval()

[[ 12.]]

[[ 6.  6.]

 [ 6.  6.]]


  5) Watch Out Broadcast


2. Function

  1) Reduce mean 

tf.reduce_mean([1, 2], axis=0).eval()

x = [[1., 2.],

     [3., 4.]]

tf.reduce_mean(x).eval()

tf.reduce_mean(x, axis=0).eval()

tf.reduce_mean(x, axis=1).eval()

tf.reduce_mean(x, axis=-1).eval()

1

2.5

[ 2.  3.]

[ 1.5  3.5]

[ 1.5  3.5]


  2) Reduce sum

x = [[1., 2.],

     [3., 4.]]

tf.reduce_sum(x).eval()

tf.reduce_sum(x, axis=0).eval()

tf.reduce_sum(x, axis=-1).eval()

tf.reduce_mean(tf.reduce_sum(x, axis=-1)).eval()

10.0

[ 4.  6.]

[ 3.  7.]

5.0


  3) Argmax : 가장 큰 값의 위치가 어디냐? 

x = [[0, 1, 2],

     [2, 1, 0]]

tf.argmax(x, axis=0).eval()

tf.argmax(x, axis=1).eval()

tf.argmax(x, axis=-1).eval()

[1 0 0]

[2 0]

[2 0]


  4) Reshape, squeeze, expand

t = np.array([[[0, 1, 2], 

               [3, 4, 5]],              

              [[6, 7, 8], 

               [9, 10, 11]]])

t.shape

tf.reshape(t, shape=[-1, 3]).eval()

tf.reshape(t, shape=[-1, 1, 3]).eval()

tf.squeeze([[0], [1], [2]]).eval()

tf.expand_dims([0, 1, 2], 1).eval()

(2, 2, 3)

[[ 0  1  2]

 [ 3  4  5]

 [ 6  7  8]

 [ 9 10 11]]

[[[ 0  1  2]]


 [[ 3  4  5]]


 [[ 6  7  8]]


 [[ 9 10 11]]]

[0 1 2]

[[0]

 [1]

 [2]]


  5) Onehot : 

tf.one_hot([[0], [1], [2], [0]], depth=3).eval()

t = tf.one_hot([[0], [1], [2], [0]], depth=3)

tf.reshape(t, shape=[-1, 3]).eval()

[[[ 1.  0.  0.]]

 [[ 0.  1.  0.]]

 [[ 0.  0.  1.]]

 [[ 1.  0.  0.]]]


[[ 1.  0.  0.]

 [ 0.  1.  0.]

 [ 0.  0.  1.]

 [ 1.  0.  0.]]


  6) Cast / Stack /ones-zeros / zip

tf.cast([1.8, 2.2, 3.3, 4.9], tf.int32).eval()

tf.cast([True, False, 1 == 1, 0 == 1], tf.int32).eval()

#Stack

x = [1, 4]

y = [2, 5]

z = [3, 6]

# Pack along first dim.

tf.stack([x, y, z]).eval()

tf.stack([x, y, z], axis=1).eval()

x = [[0, 1, 2],

     [2, 1, 0]]

tf.ones_like(x).eval()

tf.zeros_like(x).eval()

#Zip

for x, y in zip([1, 2, 3], [4, 5, 6]):

    print(x, y)

for x, y, z in zip([1, 2, 3], [4, 5, 6], [7, 8, 9]):

          print(x, y, z)[1 0 0]

===cast

[1 2 3 4]

[1 0 1 0]

===stack

[[1 4]

 [2 5]

 [3 6]]

[[1 2 3]

 [4 5 6]]

===ones, zeros

[[1 1 1]

 [1 1 1]]

[[0 0 0]

 [0 0 0]]

===zip

1 4

2 5

3 6

1 4 7

2 5 8

3 6 9

Posted by 꿈을펼쳐라
,

Lec 07-1 Learning Rate, Overfitting and Regularization

1. Determining Learning Rate

    1) Try Several learning Rates ( start with 0.01 )

    2) Observe the cost function 

    3) Check it goes down in a reasonable rate 

      - 너무 크면 divergence ,  너무 작은면 늦게 수렴


2. Data(X) Preprocessing for gradient descent 

   1) RAW data가 편중되어 있을 경우, 특정 변수의 민감도가 높거나 낮아질 수 있음. 

   2) Normalization 


    3) Standardization 


           X_std[:,0] = (X[:0] - X[:,0].mean()) / X[:,0].std()   


2. Regularization  

   1) OverFitting 

      - Our model is very good with training data set (with memorization)

      - Not good at test dataset or in real use

    2) Solutions for overfitting 

       - More Training data 

       - Reduce the number of features 

       - Regularization 


    3) Regularization 

       - Let's not have too big numbers in the weight      


        ( Loss함수에 Weight크기를 포함하도록 함으로써 해당 값도 최소화하는 경우를 찾고자 함)  

       - with Tensorflow 

          l2reg = 0.001 * tf.reduce_sum(tf.square(W)) 


Lec 07-2: Training/Testing Data Set


1. Data set 


2. Online Learning 

    1) 데이터 셋을 여러 단위로 분리해서 예측 진행

    2) 이전 단계에서 예측돼었던 내용이 새로운 데이터 셋 예측에서도 동일한 영향을 주여야 함 


3. M NIST Data set


Lab 07-1: training/test dataset, learning rate, normalization


1. Test Dataset  & Learning Rate  

  0) Test Data

   # Evaluation our model using this test dataset

   x_test = [[2, 1, 1],          

            [3, 1, 2],       

            [3, 3, 4]]

   y_test = [[0, 0, 1],

             [0, 0, 1],

             [0, 0, 1]]


   1) optimizer = tf.train.GradientDescentOptimizer(learning_rate=1e-10).minimize(cost)

TOOL Small : Local Min. No Progress


200 5.73203 [[ 0.80269569  0.67861289 -1.21728313]

 [-0.3051686  -0.3032113   1.50825703]

 [ 0.75722361 -0.7008909  -2.10820389]]

Prediction: [0 0 0]

Accuracy:  0.0

   2) optimizer = tf.train.GradientDescentOptimizer(learning_rate=1.5).minimize(cost)

TOOL Large : Divergen


200 nan [[ nan  nan  nan]

 [ nan  nan  nan]

 [ nan  nan  nan]]

Prediction: [0 0 0]

Accuracy:  0.0

  3) optimizer = tf.train.GradientDescentOptimizer(learning_rate=0.1).minimize(cost)

Proper Initial : 


200 0.670909 [[-1.15377057  0.2814692   1.13632655]

 [ 0.37484601  0.18958248  0.33544892]

 [-0.35609847 -0.43973017 -1.256042  ]]

Prediction: [2 2 2]

Accuracy:  1.0


2. Normalized input

  1) Large Value Raw Data 

     y = np.array([[828.659973, 833.450012, 908100, 828.349976, 831.659973],

                   [823.02002, 828.070007, 1828100, 821.655029, 828.070007],

                   [819.929993, 824.400024, 1438100, 818.97998, 824.159973],

                   [816, 820.958984, 1008100, 815.48999, 819.23999],

                   [819.359985, 823, 1188100, 818.469971, 818.97998],

               [819, 823, 1198100, 816, 820.450012],

                   [811.700012, 815.25, 1098100, 809.780029, 813.669983],

                   [809.51001, 816.659973, 1398100, 804.539978, 809.559998]])

100 Cost:  nan 

Prediction:

 [[ nan]

 [ nan]

 [ nan]

 [ nan]

 [ nan]

 [ nan]

 [ nan]

 [ nan]]


Process finished with exit code 0


  2) Normalized input 

def MinMaxScaler(data):

    numerator = data - np.min(data, 0)

    denominator = np.max(data, 0) - np.min(data, 0)

    # noise term prevents the zero division

    return numerator / (denominator + 1e-7)


...


xy = MinMaxScaler(xy)


100 Cost:  0.0136869 

Prediction:

 [[ 1.12295258]

 [ 0.63500863]

 [ 0.53340685]

 [ 0.4315863 ]

 [ 0.53191048]

 [ 0.55868214]

 [ 0.15761785]

 [ 0.14425412]]


Process finished with exit code 0


Lab 07-2: Meet MNIST Dataset


1. MNIST  Image

  1) 28 * 28 * 1 Image (Binary Bitmap


# MNIST data image of shape 28 * 28 = 784

X = tf.placeholder(tf.float32, [None, 784])

# 0 - 9 digits recognition = 10 classes

Y = tf.placeholder(tf.float32, [None, nb_classes])


2. Reading Data and set variables


from tensorflow.examples.tutorials.mnist import input_data

# Check out https://www.tensorflow.org/get_started/mnist/beginners for

# more information about the mnist dataset

mnist = input_data.read_data_sets("MNIST_data/", one_hot=True)


nb_classes = 10


# MNIST data image of shape 28 * 28 = 784

X = tf.placeholder(tf.float32, [None, 784])

# 0 - 9 digits recognition = 10 classes

Y = tf.placeholder(tf.float32, [None, nb_classes])


W = tf.Variable(tf.random_normal([784, nb_classes]))

b = tf.Variable(tf.random_normal([nb_classes]))


...
batch_xs, batch_ys = mnist.train.next_batch(100)
...
print("Accuracy: ", accuracy.eval(session=sess, feed_dict={X: mnist.test.images, Y: mnist.test.labels}))


3. SoftMax

# Hypothesis (using softmax)

hypothesis = tf.nn.softmax(tf.matmul(X, W) + b)


cost = tf.reduce_mean(-tf.reduce_sum(Y * tf.log(hypothesis), axis=1))

optimizer = tf.train.GradientDescentOptimizer(learning_rate=0.1).minimize(cost)


# Test model

is_correct = tf.equal(tf.arg_max(hypothesis, 1), tf.arg_max(Y, 1))

# Calculate accuracy

accuracy = tf.reduce_mean(tf.cast(is_correct, tf.float32))


4. epoch / Batch


1) 데이터가 많을 경우, 모든 데이터를 올리려면 Memory가 많이 필요하므로, Batch로 분할하여 적용

2) epoch [에폭] : 전체 데이터를 한번 모두 훈련하는 과정

3) iteration per epoch = [전체데이터 수] / [batch_size]


# parameters

training_epochs = 15

batch_size = 100


with tf.Session() as sess:

   # Initialize TensorFlow variables

   sess.run(tf.global_variables_initializer())

   # Training cycle

   for epoch in range(training_epochs):

       avg_cost = 0

       total_batch = int(mnist.train.num_examples / batch_size)


       for i in range(total_batch):

           batch_xs, batch_ys = mnist.train.next_batch(batch_size)

           c, _ = sess.run([cost, optimizer], feed_dict={X: batch_xs, Y: batch_ys})

           avg_cost += c / total_batch


       print('Epoch:', '%04d' % (epoch + 1), 'cost =', '{:.9f}'.format(avg_cost))


5. Result


1) 0.8951 정확도


Epoch: 0007 cost = 0.591160339 Epoch: 0008 cost = 0.563868978 Epoch: 0009 cost = 0.541745167 Epoch: 0010 cost = 0.522673571 Epoch: 0011 cost = 0.506782322 Epoch: 0012 cost = 0.492447640 Epoch: 0013 cost = 0.479955830 Epoch: 0014 cost = 0.468893666 Epoch: 0015 cost = 0.458703479 Learning finished Accuracy: 0.8951 Label: [3] Prediction: [5] 


3을 5로 인식한 결과

7을 2로 인식하였다.   아직 89 % 정확도 이니까...


  2) Learning Rate, Epoch 회수 조정으로 정확도를 더 높일 수 있다.  

     Learning Rate = 0.4 ,   Epoch = 100시     92.25%

Epoch: 0098 cost = 0.243552753

Epoch: 0099 cost = 0.243438786

Epoch: 0100 cost = 0.243145558

Learning finished

Accuracy:  0.9225

Label:  [5]

Prediction:  [5]


Posted by 꿈을펼쳐라
,

Lec 06-1 - Softmax Regression 기본 개념 소개

1. Logistic Regression 

    1) Liner Regression의 한계

      -   : 아주 큰수 ,아주 작은 수 적용시에도 선형적 가중치가 적용되어 오차 증가

    2) Logistic Resgression

      - Logistic(Sigmoid) Function : Binary Classification에 적당하도록 아주 큰수, 아주 작은 수 사이에서도 

         0~1 가 되도록 해주는 함수 


2. Multinomial classification

   1)  학점 ABC 구현 - Binary Classification 3개  


Lec 06-2: Softmax classifier 의 cost함수


1. SoftMax Function


   1) Multinomial classification Sigmoid      


     각 Element 가 0 ~ 1 사이값이 되었지만 각각의 상관 관계를 표현하지 못함


   2) SoftMax 


       SCORES                                    POSSIBILITIES


    3) One-Hot Encoding


    4) Cross-entropy cost function 


         S : 예측값,    L : 실제값 


        [check cost function] 


  5) Cross-Entropy vs Logistic Cost  (증명?)  


Lab 06-1: TensorFlow로 Softmax Classification의 구현


1. Hypothesis with SOFTMAX

tf.matmul(X,W) + b 
hypothesis = tf.nn.softmax(tf.matmul(X,W) + b)

2. Cost Function : Cross Entropy

# Cross entropy cost/loss

cost = tf.reduce_mean(-tf.reduce_sum(Y * tf.log(hypothesis), axis=1))


optimizer = tf.train.GradientDescentOptimizer(learning_rate=0.1).minimize(cost)


3. Test & One-Shot Encoding

  1) One Row 

# Testing & One-hot encoding

a = sess.run(hypothesis, feed_dict={X: [[1, 11, 7, 9]]})

print(a, sess.run(tf.arg_max(a, 1)))


raw : [[  1.38904958e-03   9.98601854e-01   9.06129117e-06]]

output : [1]


  2) multi Row 

# Testing & One-hot encoding

all = sess.run(hypothesis, feed_dict={X: [[1, 11, 7, 9], 

                                          [1, 3, 4, 3], 

                                          [1, 1, 0, 1]]})

print(all, sess.run(tf.arg_max(all, 1)))


raw : [[  1.38904958e-03   9.98601854e-01   9.06129117e-06]

[  9.31192040e-01   6.29020557e-02   5.90589503e-03]

[  1.27327668e-08   3.34112905e-04   9.99665856e-01]]

output: [1 0 2]


Lab 06-2: TensorFlow로 Softmax Classification의 구현


1. softmax_cross_entropy_with_logits 


logits = tf.matul(X,W) + b

hypothesis = tf.nn.sotfmax(logits) 


cost = tf.reduce_mean(-tf.reduece_sum(Y * tf.log(hypothesis), axis =1)) 


   cost_i = tf.nn.softmax_coress_entropy_with_logits(logits = logits, labels = Y_one_hot) 


   cost = tf.redue_mean(cost_i)


2. Animal Classification 

  1) load data 

xy = np.loadtxt('data-04-zoo.csv', delimiter= ',', dtype=np.float32) 


x_data = xy[:,0:-1]

y_data = xy[:,[-1]]


hypothesis = tf.nn.sotfmax(logits) 


cost = tf.reduce_mean(-tf.reduece_sum(Y * tf.log(hypothesis), axis =1)) 


  2) ont_hot and reshape 


     Y = tf.placeholder(tf.int32, [None, 1])   # 0~ 6 shape =(?,1)

     Y_one_hot = tf.one_hot(Y, nb_classes)  # one hot shape (?, 1,7) 

     Y_one_hot = tf.reshape(Y_.one_hot, [-1, nb_classes])  # one hot shape (?,7) 


3. Result

'''
Step:     0 Loss: 5.106 Acc: 37.62%
Step:   100 Loss: 0.800 Acc: 79.21%
Step:   200 Loss: 0.486 Acc: 88.12%
Step:   300 Loss: 0.349 Acc: 90.10%
Step:   400 Loss: 0.272 Acc: 94.06%
Step:   500 Loss: 0.222 Acc: 95.05%
Step:   600 Loss: 0.187 Acc: 97.03%
Step:   700 Loss: 0.161 Acc: 97.03%
Step:   800 Loss: 0.140 Acc: 97.03%
Step:   900 Loss: 0.124 Acc: 97.03%
Step:  1000 Loss: 0.111 Acc: 97.03%
Step:  1100 Loss: 0.101 Acc: 99.01%
Step:  1200 Loss: 0.092 Acc: 100.00%
Step:  1300 Loss: 0.084 Acc: 100.00%
...
[True] Prediction: 0 True Y: 0
[True] Prediction: 0 True Y: 0
[True] Prediction: 3 True Y: 3
[True] Prediction: 0 True Y: 0
[True] Prediction: 0 True Y: 0


Posted by 꿈을펼쳐라
,

Lec 05-1 - Logistic Classification의 가설 함수 정의


1. Classification

   - Regression은 특정 값을 예측하는 것에 비해, Classification은 분류 하는 것, 

   - binary Classification은 두개 중 하나 분류,  Ture / False    1/0

   - Spam Detection: Spam or Ham

   - Facebook feed: show or hide

   - Credit Card Fraudulent Transaction detection: legitimate/fraud


2. Logistic Hypothesis

   1) Linear Regression 적용시 문제점 

     - 과도하게 크거나 작은 범위의 값이 적용될 경우 왜곡이 쉽게 발생함   

      EX)  5시간 공부해도 합격, 100 시간 공부해도 합격

   2) 0과 1사이의 Cost Fuction :   logistic function / sigmoid function


       sigmoid  : Curved in two directions, like the letter "S", or the Greek ς (sigma)


                       sigmoid 함수에 대한 이미지 검색결과


    3) Logistic Hypothesis with Vector


Lec 05-2 - Logistic Regression의 cost 함수 설명


1. cost Function   


   1) 기존 코스트 함수 : local minimum 발생으로 최소값을 찾기 곤란함


   2) New Cost Function Concept


    (그래프 그려주는 사이트 : https://www.desmos.com/calculator )


2. understanding New cost Fuction

       - y=1,  H(x) =1     -> correct   -> cost Low  :    C( H(x), y) = -log ( 1 ) = 0 

       - y=1,  H(x) =0     -> wrong    -> cost high  :    C( H(x), y) = -log ( 0 ) = 무한대

       - y=0,  H(x) =0     -> correct   -> cost Low  :    C( H(x), y) = -log ( 1 - 0) = 0 

       - y=0,  H(x) =1     -> wrong    -> cost high :    C( H(x), y) = -log ( 1 - 1) =  - log (0) =  무한대 


3. New cost Fuction  : 두 경우의 선형 조합


4. Minimize Cost


Lab 05: TensorFlow로 Logistic Classification의 구현하기


1. Logistic Regression


2. code


Posted by 꿈을펼쳐라
,